Motorcycle HID kit Installation Guide
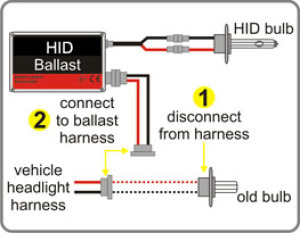
As you can see below the Motorcycle HID kit Installation Guide is pretty straight foward. Please note that some kits will not have a connector for vehicles harness, instead there will be two metal connectors that need to be inserted into the vehicle headlight harness.

Motorcycle HID Kit Installation
1. Remove your headlight or get access behind the headlight to remove the bulb or bulbs if your motorcycle has 2 headlights.
2. Replace the bulb as shown below. Below example is an H7 single filiment bulb which was replaced with the HID version. Its a direct replacement.
3. Connect the wires from factory plug to ballast, and then connect the bulb connectors to the ballast. If your kit came with a Relay wire harness, you can use this by connecting the relay harness directly to your battery.
4. Mount ballast on a secure location by twist ties, bolting or double back tape/velcro.
Your Motorcycle HID kit is installed, put everything back together. Before you put it back together we recommend you test it and make sure everything is lighting up correctly.
H7 HID Bulb Size Installation
1. Get access to your bulb by removing parts or covers. Each car is different, please consult your owners manual for getting access to the bulb. Disconnect the original vehicles connector that is attached to the bulb and carefully REMOVE the bulb.
2. Drill hole in the cover if one exists for your vehicle to run the HID wires. 1 set of wires runs for the bulb connection and 1 to get power from the cars original wiring plug. You simply have to stick in the terminal connectors into the vehicles original connector. Install your new HID bulb carefully without touching the glass. Run the wires from the location where you will mount the ballasts to the bulb area. Make connection
3. Mount your ballast in a secure place and make sure the connections are tight. You can use zip-tie, double back tape or screws.


