Apple's new MacOS Sierra software introduces two ways to help you offload files from your Mac to iCloud. It lets you reclaim storage space on your local drive, while also making those files accessible from your other devices.
The first way lets you sync your Desktop and Documents folders to iCloud Drive, so that files in either location are more easily accessible, as long as you have an internet connection. The second way lets you move to iCloud Drive or simply delete older files to reclaim some space on your Mac's cluttered drive or, as Apple calls it, optimize Mac storage.
Before we jump in, you should know that some of the options below require you to set up an iCloud Drive account, namely uploading your Desktop and Documents folders and your Photos library to iCloud. Apple provides a meager 5GB of space for free, a limit you must share with any of your iPhones or iPads that use iCloud and will most certainly exceed in short order, even if you don't opt to upload your photos. If 5GB of space won't cut it, you will need to upgrade to an iCloud Drive paid plan.
Let's take a look at how you might optimize your Mac's storage with Mac OS Sierra.
How MacOS Sierra frees storage space
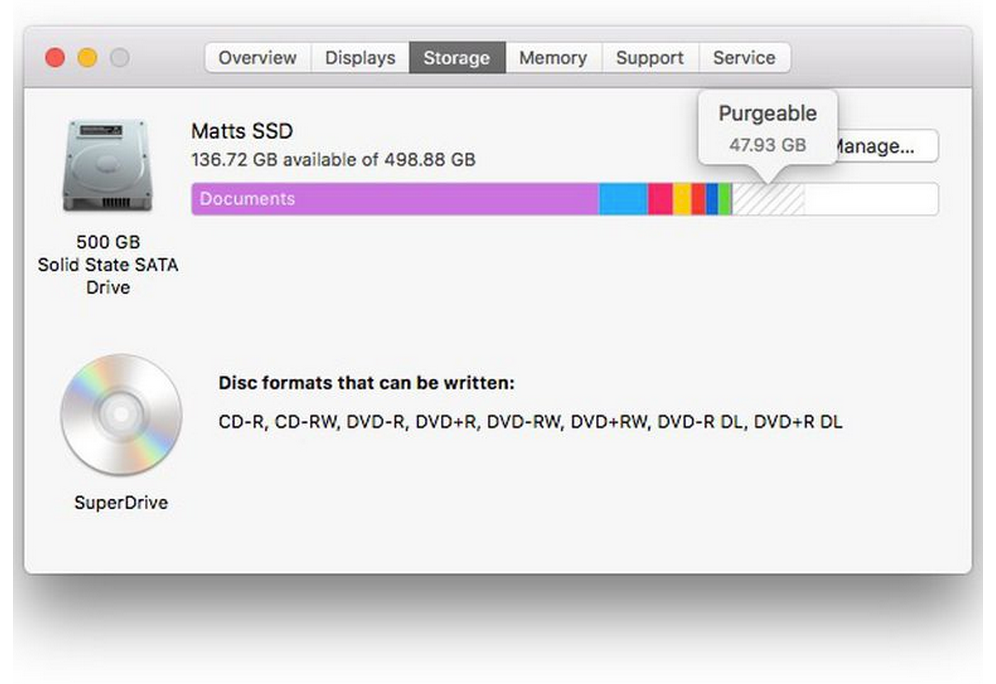
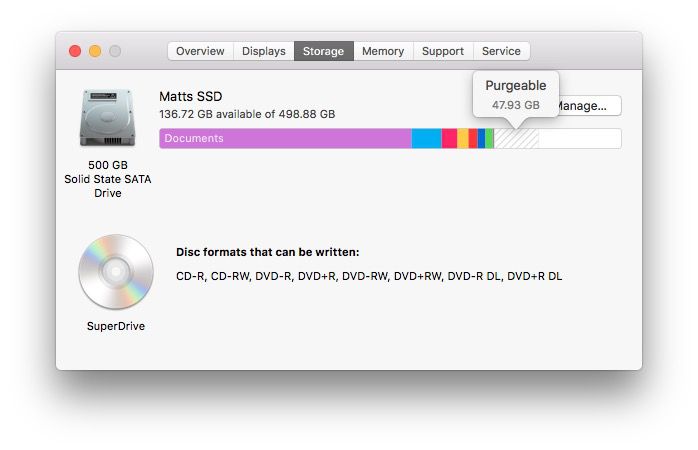
Sierra makes space by finding data that's "Purgeable," then gives you a few ways to get rid of it.
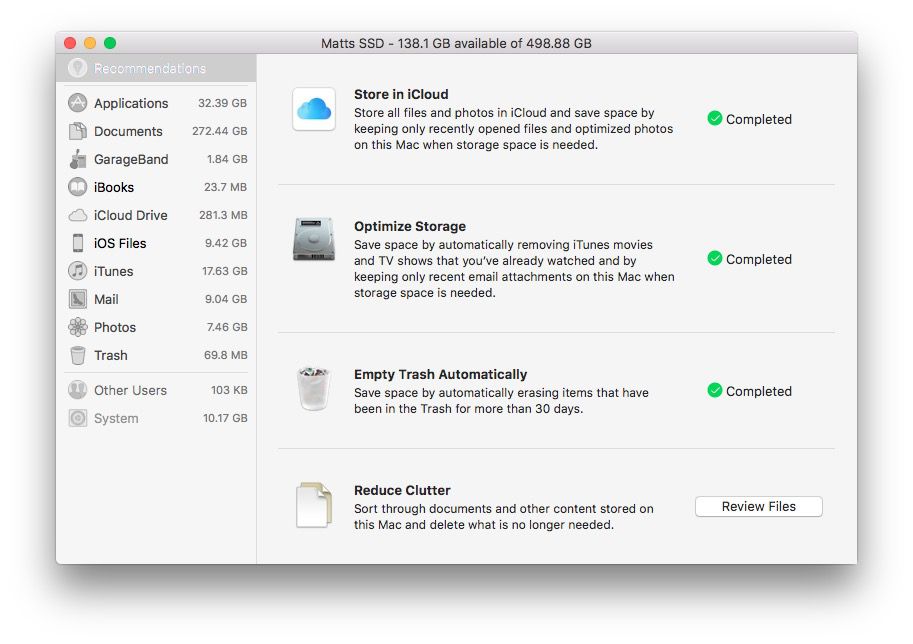
To enable MacOS Sierra's optimized storage feature, click the Apple icon in the upper-left corner of your screen and choose About This Mac. Next, click on the Storage tab and look for the striped block of Purgeable storage. This Purgeable block represents the amount of drive space you can reclaim via MacOS Sierra's optimized storage setting. From this tab, click the Manage button and you'll see four ways to clean up your Mac's drive:
Store in iCloud
By enabling the Store in iCloud setting, older files in those folders are moved from your Mac to iCloud Drive to free up space. It works in conjunction with syncing your Desktop and Documents folders to iCloud Drive, in that it creates copies of your files in the cloud, but instead of just copying files, it moves some when you begin to run low on free space.
When files and folders are moved to iCloud, they're marked with a little cloud icon. Consider these marked files placeholders, since they're not really there -- clicking on one will prompt a download.
If you have iCloud Photo Library enabled in the Photos app, this setting also stores your original, full-resolution photos in iCloud, leaving behind "optimized" versions on your Mac to save space.
Apple's description of how it determines which files to remove from your Mac and store in iCloud Drive is frustratingly vague: "When space is needed on your Mac, files from your Desktop and Documents folders that you use less frequently are kept in iCloud, where you can download them on demand."
Optimize Storage
This option removes movies and shows you've already watched from iTunes -- you can download them again should the desire arise to rewatch a previous purchase. It also tells the Mail app to download only recent email attachments when you're low on free storage.
Empty Trash Automatically
Since the virtual garbage man doesn't come around once a week to collect my Mac's trash, I remember with great infrequency to empty it. With this setting, items older than 30 days are deleted from the Trash, similar to how the Photos app on your iPhone or Mac treats trashed photos.
Reduce Clutter
This last option lets you review files, starting with large ones -- in my case, videos I could either delete or move to an external drive. You can also browse your downloaded files to delete many installers you likely no longer need. Lastly, there's a File Browser so you can search and destroy any files you no longer need, though it's no more helpful than taking a spin through Finder. Really, this Reduce Clutter option is most useful for finding and deleting large files and download installers.
How to undo changes
When you enable the first three settings, you get a green check mark to show you've completed each task but aren't left with a way to disable them. Thankfully, these settings can be enabled -- and disabled -- elsewhere in MacOS Sierra.
To undo the first option -- Store in iCloud Drive -- open System Preferences and click on iCloud. Next, click the Options button for iCloud Drive and then uncheck the box for Optimize Mac Storage.
To undo the second option -- Optimize Storage -- you need to go into both iTunes and Mail. In iTunes, open Preferences, click the Advanced tab and uncheck the box for Automatically delete watched movies and TV shows. In Mail, open Preferences, click the Accounts tab, and for each of your accounts, you can choose All, Recent or None for Download Attachments. In this case, you would choose All to undo the change made above.
To undo the third option -- Empty Trash Automatically -- go to Finder > Preferences and on the Advanced tab, uncheck the box for Remove items from the Trash after 30 days.
Don't forget about Photos
If you didn't have iCloud Photo Library enabled before you set up MacOS Sierra's optimized storage, then you missed out on the optimized storage option for your photo library, which likely occupies a big chunk of your Mac's drive. Thankfully, you can enable this setting in the Photos app itself.
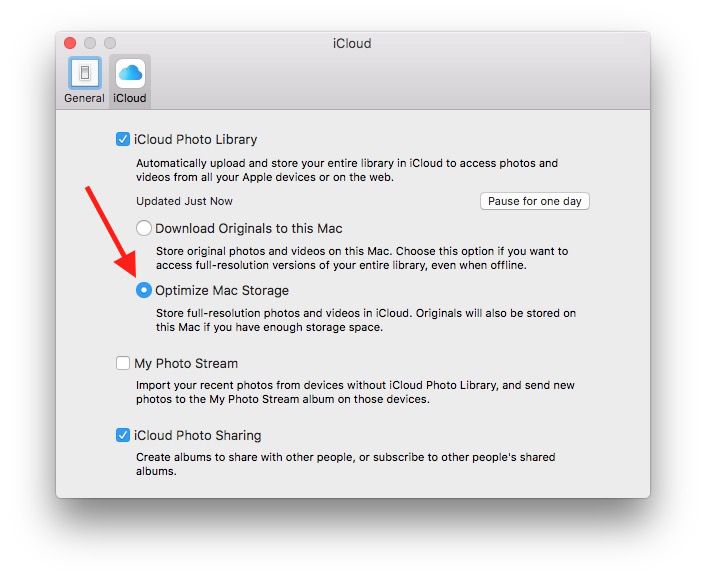
Open the Photos app and then go to Photos > Preferences and click on the iCloud tab. Check the box for iCloud Photo Library to upload your library to iCloud (it can take a while to complete; it's best to run this overnight if you have a large library). With iCloud Photo Library enabled, you can either keep original photos on your Mac or choose Optimize Mac Storage. This puts full-resolution photos in iCloud but removes originals if you start to run short on local storage space, leaving behind lower-resolution placeholders on your Mac.


