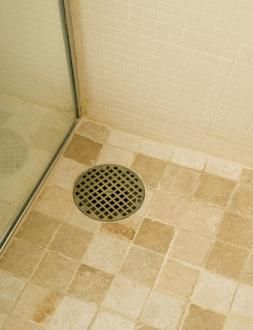
The shower area is the most visible part of a bathroom. When your bathroom decor starts looking dull and boring, then the simplest way to improve its visual appeal is by tiling the shower floor. This gives a classy look to your bathroom designs. If you are hesitant about installing tile in the shower floor thinking that the job is difficult and you do not have the required skills then let me assure you that tiling a shower floor is much simpler than you actually think.
How to Tile a Shower Floor
Ceramic tile is the most preferred tiles for bathroom flooring because it is easy to clean and does not suffer damage when exposed to water. Besides, the tiles, you need some other tools and materials for the job. They are: thinset mortar, grout, trowel, tile spacers, grout float, wet saw, a bucket of water and sponge. Once you have gathered all these thing in the work area, follow the step by step instructions given below:
Preparing the Area: A good preparation of the work area is very important as it helps to carry out the entire project without any obstruction. If the shower floor was tiled before, then all the old tiles should be removed first. Cover up the drain with newspaper and tape so that no debris fall into it and cause clogging later on. Remove those bathroom accessories which may come your way while working.
Installation of Cement Backer Board: A cement backer board is installed in order to obtain an even surface where the tiles can be laid very easily. It also protects the underlying floor from water exposure. Lay down the boards to cover up entire shower enclosure floor. Then fix them up with the help of cement board screws. Make sure that none of screw heads protrudes out as it can make the surface uneven.
Arrange the Tiles: Now that the floor surface is ready, it's time to lay down the tiles on the floor to create the pattern that you want as the shower's design. After laying the last row of tiles, you may find a gap where one whole tile cannot be accommodated. Measure that gap, mark that measurement on the tiles and cut them with a wet saw. Place these tile pieces into the gap. Thus you get an idea how the floor look like after tiling. Now keep aside these laid out tiles in the same order as you arranged them on the shower floor.
Apply Thinset Mortar: First of all, you have to prepare the thinset mortar by adding water to it as per the instructions provided by the manufacturer. Mix it well so that it gets a uniform consistency. Spread the prepared mortar evenly over the floor surface using a trowel.
Set the Tiles: Start setting the tiles from any one corner of the floor according to the tile design that you have already created. Place each tile on its respective position on the floor and slightly press it so that it adhere well with the mortar. To keep the space in between two tiles uniform, use plastic tile spacers. Once laying of tiles are complete, wipe off any excess of mortar from the tile surface with a damp piece of cloth. Let the thinset mortar get cured thoroughly for the next 24 hours.
Grouting the Tiles: Prepare the grout following the instructions given by the manufacturer. Before you start grouting the tiles, remove all the tile spacers that lie in between the tiles. Take a generous amount of grout on a grout float and fill up the tile gaps one by one. Push down the grout mix into the gap so that they are properly filled. Wait for an hour and let the grout dry. Then clean up the excess of grout from tile surface with water and sponge. After a few hours rub a dry piece of cloth on the tiles to clear any thin films of grout left behind. For the next 24 hours keep the installed tiles untouched. Finally, apply a grout sealer in order to protect the grout from water damage and stains.
Thus you can see that tiling a shower floor has its own share of challenges but the end result is equally fulfilling! While carrying out this task make sure that you protect yourself with adequate protective gear. Wear knee pads so that the knees do not get hurt on concrete. Also, protect your hands and eyes with the help of latex gloves and goggles.


